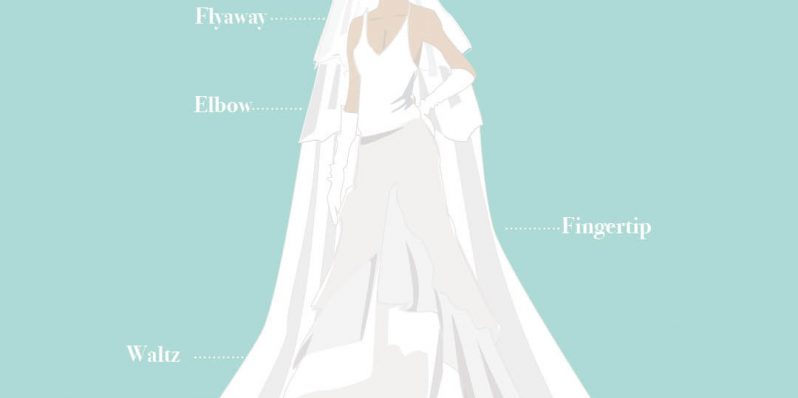
We love a good veil. These days, anything goes, and we love that so many options are available. We wanted to talk a bit about veils today: styles, colors and how to wear them.

Ellie Asher via Hey Wedding Lady
Styles
Blusher: The blusher is a classic wedding accessory. It’s the smaller part of the veil that’s worn over the face.
Fingertip: The fingertip veil gets its name because it reaches just below the waist to rest at your fingertips.
Cathedral: The cathedral veil is one of our most favorites – because it brings the drama. It extends beyond the train of your gown and typically extends down the aisle of the chapel. They make for fantastic photos. They typically run between 9 and 12 feet.
Chapel: Chapel-length veils fall just above the floor to your ankles. They are the second longest veil and also work wonderfully for photos.
Tips
We always recommended taking your veil with you to your final hair appointment before your wedding. That way, you and your stylist can come up with the best way to fasten your veil to the hair style you choose.
- Veils are typically fastened at one o’ clock (picture 12 o’ clock to be at the center of your head). This creates a sleek look by not overpowering the top of your head.
- Choose a veil that matches the exact shade of your gown – or even a shade lighter.
How to Fasten your Veil
Step 1: Fasten your veil by flipping the comb upside-down – the teeth should be facing up. The “U curve” of the comb should curve away from your head.
Step 2: Slide the comb upward so that it grabs your hair and then flip over so that the “U curve” correctly cups the back of your head.
Step 3: Wiggle the comb securely into place
Care
- You can steam the wrinkles gently out of your veil with a hand steamer.
- Make sure you hang your veil, which will naturally allow any wrinkles to loosen before your big day.
- Keep it stored away from sunlight.


2 Responses so far.